*Squeek*
 |
| "You put your left foot in, your left foot out, in out, in out..." |
When the new Tau Codex came out, I decided that having recently had quite a severe case of "EBay Addiction", (coupled with a nasty bout of "spending too damn much money") I would only purchase a few core units, and only then ones that really took my fancy. My logic for this was that I already had a large Tau force, and I didn't want to paint too much new stuff!
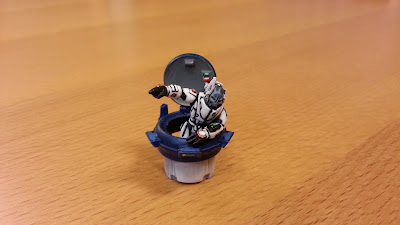
For that reason, I purchased a Riptide, (which you can see here), a Fireblade (not started) and Longstrike, "Heavy Armour Hero TM". Although I haven't played any games with these new Tau units, I figure Longstrike must almost be an "auto-take" if you are fielding Hammerheads (and facing Tyranids, which are my usual opponents.)
-Can overwatch unlimited times?
-BS 5?
...Yes please!
-Can overwatch unlimited times?
-BS 5?
...Yes please!
I can't report on his performance on the battlefield yet, but I can share with you how I painted him! (Quick disclaimer - the turret he is in, and my other Tau, were painted without washes etc, so they will look weird next to him - and my battle-damaged Riptide - but I hope to get around to weathering them all at some point!)
Paints used (Old/ New):
- Skull White (White Scar or Ceramite White)
- Chaos Black (Abaddon Black)
- Dwarf Bronze (Hashut Copper)
- Shining Gold (Gehenna's Gold)
- Red Gore (Wazdakka Red)
- Blood Red (Evil Sunz Red)
- Mordian Blue (Macragge Blue)
- Codex Grey (Dawnstone)
- Washes:
- Devlan Mud (Agrax Earthshade)
Step 1: Preparation.
Use a craft knife or file away flash/ mould lines (carefully!) Pay particular attention to this on flat surfaces, such as helmets and shoulder pads, as mould lines really show up later when painted if you don't get rid of them, especially when using white paint.Step 2: First basing.
As Longstrike is going to stand in a turret, I didn't make any base for this model.Step 3: Undercoat.
Spray paint the model(s) using the undercoat of your choice.
I use Citadel Skull White for my Tau. One of my army colours is white, so this reduces the number of white layers I need to add later. Many people prefer a Chaos Black undercoat. The overall effect will be darker but any bits in recesses you forget to paint or are difficult to get at just look like shadows (which is great). Unless white is an important colour in your army, you may prefer black because it is more forgiving.
Step 4: Basecoats.
This is where you add the basic colours to your model. After you finish this, you will be a big step closer to a finished model, but the colours will be very "flat" (which is why you will then add washes in step 5, below)
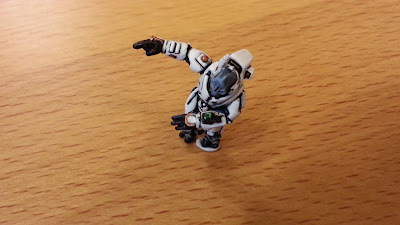
TIP: As with most models, I follow an "Inside Out" order of painting. This makes it easy to cover mistakes as you go along e.g. Start with the innermost items first. In this case, the under armour of Longstrike's suit is done in black. Then, the white armour plates are on top of those, so they are done next, finally, the details on top of the armour plates are done (info display on the forearm etc.)
- Chaos Black (Abaddon Black): Boots, gloves, uniform (between armour plates)
- Skull White (White Scar or Ceramite White): Armour plates
- Dark Angels Green (Caliban Green): Digital display on Longstrike's forearm
- Dwarf Bronze (Hashut Copper): Piping around gloves
- Red Gore (Wazzdakka Red): Buttons/ indicators on suit/ armour
- Mordian Blue (McCragge Blue): Skin
Step 5: Washes.
In this step, you are going to add shadows by adding a wash. You can either paint this into specific areas, or (as in this case) add a wash all over by applying liberally across the model.
For Longstrike, I used Agrax Earthshade on the whole model (which would usually give a dirty, grubby effect).
For Longstrike, I used Agrax Earthshade on the whole model (which would usually give a dirty, grubby effect).
TIP: To save time later, consider not applying washes to the armour plates. I applied a mud wash all over, but actually looking at the model now, I am not sure of the benefit of doing that. NOT doing this would save you reapplying white again later to clean up the armour etc. If you DO wash the whole model and you are using white, you will have to reapply several layers later (as I did for the model above) unless you want Longstrike's armour to look as though he just crawled out of a peat bog.
TIP 2: If you are like me, and you hate painting the eyes on models, consider giving a second, heavy wash around the eyes off the model. From a distance, this will look like natural shadows and good enough! (Hey, I bet Longstrike doesn't get his beauty sleep right?)
Step 6: Layers/ Highlights
Highlights or progressively lighter layers of paints provide further differentiation to the raised parts of the model from the shadowed areas you created by using washes in step 5. (Drybrushing is another way to do this.)
For Longstrike, most of the effort went into bringing the armour plates back to white:
- Armour Plates: Ceramite White: (Several layers necessary!)
- Skin: Mordian Blue, followed by a Mordian Blue/ Skull White 50/50 mix.
- Digital Display (on forearm)Dark Angels Green, followed by a Dark Angels/ Snot Green mix (50/50). Add a dot of white in one corner if you want a "Glass-like" effect.
- Switches/ Suit indicators: Red Gore (Wazzdakka Red), followed by Red Gore/ Blood Red (Evil Sunz Red) mix. OR, use green as above if you don't want to use red.
- Piping on gloves: Dwarf Bronze, followed by Shining Gold highlights.
OPTIONAL: Fortress Grey: Highlights on the edges of boots etc. (No-one is ever going to see this if you actually decide to glue him in to a turret!)
Step 7: Final Basing
As there isn't a base in this case, there ain't no "Final Basing" necessary.ALL DONE!
*Squeek*
Great work, i love those white undercoat colors.
ReplyDeleteAl
Anvil 490B Youth
Cheers Al
ReplyDelete:-)
Thanks for coming by the blog too.